How to add a picture to your JFrame in Netbeans?
When you develop applications using NetBeans how often you use JFrames? Occasionally you may want to add a picture to your JFrame(May be the main frame of your application.And you want to add your application logo on it).So this is how you are going to do that.
Creating the JFrame(For Novices)>
First open your Netbeans application .Then go to File and select New Project.Following dialog box will appear.
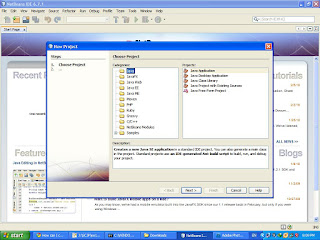
From that dialog box select Java----> Java Application (as we are going to build a desktop application) and finally press Next..If you are successful the another dialog box will appear to enter your project name.And after pressing next it will lead you to your new project.
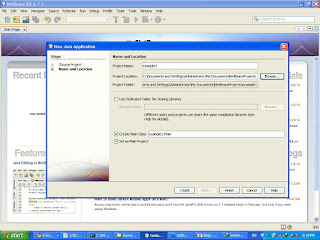
Then from your project go to Source Packages ,right click on your project name ,select New ,then select JFrame Form.And enter a preferred name for your JFrame in the dialog box ,and press Next and you have successfully created your JFrame.
Adding the Picture
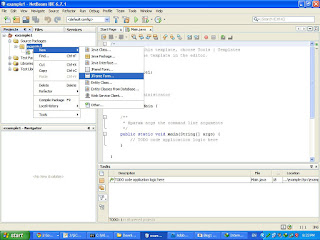
Go to the palette and then go to Swing Controls.Here you will find Label Component.Drag and drop the Label component to the JFrame.And it will give you something like this
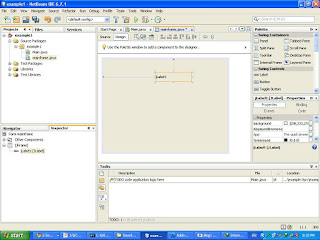
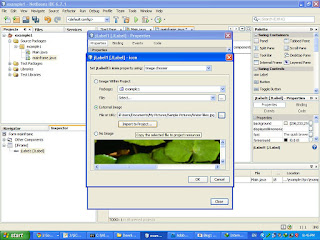
Then right click on the Label and select Properties from the drop down menu.And Locate Icon property and press the white button in that row which will lead you to a new dialog box.
Select External Image.Then provide the path to the image and finally press import to the project.
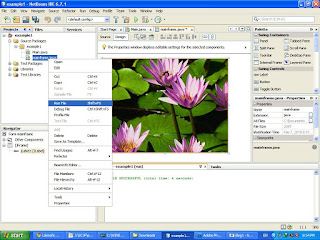
Then resize the image as you want and after you are done right click on the JFrame file in the Source packages and select run.And you can get the required output !
Creating the JFrame(For Novices)>
First open your Netbeans application .Then go to File and select New Project.Following dialog box will appear.

From that dialog box select Java----> Java Application (as we are going to build a desktop application) and finally press Next..If you are successful the another dialog box will appear to enter your project name.And after pressing next it will lead you to your new project.

Then from your project go to Source Packages ,right click on your project name ,select New ,then select JFrame Form.And enter a preferred name for your JFrame in the dialog box ,and press Next and you have successfully created your JFrame.

Adding the Picture
Go to the palette and then go to Swing Controls.Here you will find Label Component.Drag and drop the Label component to the JFrame.And it will give you something like this

Then right click on the Label and select Properties from the drop down menu.And Locate Icon property and press the white button in that row which will lead you to a new dialog box.
Select External Image.Then provide the path to the image and finally press import to the project.

Then resize the image as you want and after you are done right click on the JFrame file in the Source packages and select run.And you can get the required output !


Comments
Post a Comment
Leave your ideas